10 Easy DIY Projects to Achieve Shabby Chic Decor
Introduction to Shabby Chic Decor
What is Shabby Chic Decor?
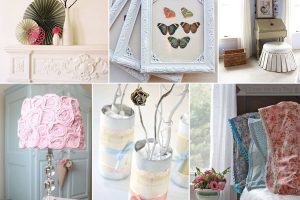
Shabby Chic decor is a charming interior design style that combines vintage appeal with a rustic, worn-in aesthetic. Characterized by its soft, delicate color palettes—think pastel hues and muted tones—this style embraces the beauty of imperfection. Typically, it features distressed furniture, antique finds, and floral patterns. For instance, a well-loved armchair adorned with frayed edges and a faded floral cushion epitomizes the essence of Shabby Chic. This decor invites warmth and character into any space, making it feel more like home.
- 10 Easy DIY Projects to Achieve Shabby Chic Decor
- Introduction to Shabby Chic Decor
- What is Shabby Chic Decor?
- Benefits of Incorporating Shabby Chic Style
- Upcycled Furniture Projects
- Distressed Dresser Upcycling
- Vintage Frame Chalkboard DIY
- Textile Crafts for Shabby Chic Touch
- Shabby Chic Rag Wreath
- DIY Floral Pillow Covers
- Rustic Home Decor Projects
- Mason Jar Vase Centerpiece
- Wooden Crate Storage Shelves
- Vintage-Inspired Wall Art
- Antique Window Frame Gallery Wall
- Fabric-Covered Canvas Art DIY
- Floral Arrangements for Shabby Chic Vibes
- Mason Jar Floral Centerpiece
- Teacup Succulent Planters
- Decorative Accessories Revamp
- Lace-Wrapped Mason Jar Candle Holders
- Vintage Book Page Decoupage Vase
- Shabby Chic Lighting Projects
- Mason Jar Pendant Lights
- Shabby Chic Chandelier Makeover
- Outdoor Shabby Chic Decor Ideas
- Upcycled Garden Bench
- Vintage Bicycle Planter Display
- Conclusion and Final Tips for Achieving Shabby Chic Decor
- Final Tips to Embrace Shabby Chic Style
Benefits of Incorporating Shabby Chic Style
Adding Shabby Chic elements to your home provides several advantages:
- Unique Character: Each piece often has a story, bringing individuality to your decor.
- Cost-Effective: Upcycling and thrifting vintage finds can save money while enriching your space.
- Comforting Ambiance: The soft colors and cozy patterns create a relaxing environment.
- Sustainable Living: Promoting the reuse of furniture and materials contributes to an eco-friendly lifestyle.
Incorporating Shabby Chic style not only transforms a room but also tells a beautiful story of nostalgia and creativity. It’s a delightful way to express personal style while embracing the charm of yesteryears.
Upcycled Furniture Projects
Distressed Dresser Upcycling
Upcycling is one of the most enjoyable ways to breathe new life into old furniture, and a distressed dresser project can be particularly rewarding. Imagine transforming a mundane, outdated piece into a stunning focal point for your bedroom or hallway. To start, gather materials such as sandpaper, chalk paint, and a brush. Here’s how to proceed:
- Prep the Surface: Lightly sand the dresser to remove any gloss.
- Apply Paint: Choose a soft, pastel color that fits the Shabby Chic theme.
- Distress the Edges: Once the paint dries, gently sand the edges to achieve that perfect worn look.
- Seal It: Finish with a clear wax for added durability.
This project doesn’t just spruce up your space; it creates a sense of history and warmth.
Vintage Frame Chalkboard DIY
Another charming way to incorporate the Shabby Chic aesthetic is by turning an old picture frame into a chalkboard. This project adds functionality and whimsy to your decor. Follow these simple steps:
- Select a Frame: Look for an ornate vintage frame at thrift stores or garage sales.
- Remove the Glass: Carefully take out the glass and replace it with a piece of MDF or a cutting board.
- Paint It: Use chalkboard paint on the new surface for versatility.
- Accessorize: Enhance it with dry flowers or hang it with vintage twine.
With this DIY project, not only will you have a decorative chalkboard for notes or menus, but it will also serve as a fantastic conversation starter in your space. Upcycling is not just about saving money; it’s about crafting a unique story for your home!
Textile Crafts for Shabby Chic Touch
Shabby Chic Rag Wreath
Textile crafts add an inviting touch to any Shabby Chic decor, and one delightful project to consider is a Shabby Chic rag wreath. This handmade adornment not only brings warmth to your front door but also can be a fantastic way to repurpose fabric scraps. To create your own, gather materials:
- Fabric scraps: Choose a mix of floral prints, lace, and soft pastels.
- Wire Frame: A simple wreath frame works well.
- Scissors: To cut your fabric into strips.
Then, follow these easy steps:
- Cut Fabrics: Cut the fabric into 1-inch wide strips.
- Tie Strips: Tie the strips securely onto the frame, alternating colors and patterns.
- Fluff It Up: Give it a light fluff to create fullness.
This project reflects your personal style and adds texture to your home!
DIY Floral Pillow Covers
Another way to embrace the Shabby Chic charm is by creating DIY floral pillow covers. Soft pillows can instantly elevate the coziness of your living space, and making your own allows for complete customization. Consider these materials:
- Fabric: Opt for cotton or linen with delightful floral patterns.
- Sewing Supplies: You’ll need a sewing machine, thread, and pins.
Steps to follow:
- Measure and Cut: Cut fabric to your desired pillow size, allowing a half-inch seam allowance.
- Sew Together: With right sides facing, sew around three edges, leaving one side open for inserting the pillow.
- Turn Inside Out: Flip it to the right side, insert the pillow, and sew the final side shut.
These floral pillow covers will not only brighten up your furniture but also give you a sense of accomplishment as you add your handmade touch to your decor. Embracing textile crafts is a charming way to enhance the warmth and comfort of your Shabby Chic haven.
Rustic Home Decor Projects
Mason Jar Vase Centerpiece
When it comes to rustic home decor that exudes Shabby Chic vibes, a Mason jar vase centerpiece is a simple and elegant project that anyone can tackle. These versatile jars can be found in abundance at thrift stores or even in your kitchen pantry, just waiting for a creative makeover. To create this charming centerpiece, you’ll need:
- Mason Jars: Choose various sizes for depth and interest.
- Floral Arrangements: Fresh or artificial flowers work beautifully.
- Twine or Lace: Add a hint of rustic charm with some natural fibers.
Here’s how to assemble it:
- Fill Jars: Begin by filling each Mason jar with your choice of flowers.
- Embellish: Wrap twine or lace around each jar for that extra touch.
- Arrange: Group the jars together on a table or mantle for a stunning effect.
This lovely centerpiece is perfect for gatherings or just to brighten up a room!
Wooden Crate Storage Shelves
Another fantastic rustic project is creating wooden crate storage shelves. Functional yet stylish, these shelves can provide both display space and storage, making your room feel organized without sacrificing style. To get started, gather your materials:
- Wooden Crates: Find sturdy crates in various sizes.
- Wood Stain or Paint: Choose a finish that complements your decor.
- Brackets: Use brackets for securing the crates to the wall.
Follow these steps to build your shelves:
- Prep Your Crates: Sand down any rough edges and stain or paint them as desired.
- Attach to Wall: Use brackets to secure the crates in a visually appealing arrangement.
- Style Your Shelves: Fill the crates with books, plants, or decorative items that resonate with your style.
These wooden crates not only provide practical storage solutions but also instill a rustic charm that enhances the Shabby Chic aesthetic in your home. By incorporating these projects, you can effortlessly blend functionality with the warmth of rustic decor!
Vintage-Inspired Wall Art
Antique Window Frame Gallery Wall
Creating a vintage-inspired wall art display can transform your space into a charming showcase, and an antique window frame gallery wall is a perfect option. This project not only highlights your love for vintage decor but also serves as a stunning conversation starter. To start, seek out old window frames at flea markets, garage sales, or even in your own attic. Here’s what you’ll need:
- Antique Window Frames: Choose various sizes and styles for visual interest.
- Photos or Artwork: Display special memories or favorite prints within the panes.
- Hanging Hardware: Make sure to have the right hooks for wall mounting.
Steps to create your gallery wall:
- Arrange Frames: Before hanging, lay the frames out on the floor to plan the layout.
- Mount on Wall: Securely fasten the frames using hooks or nails.
- Add Personal Touches: Incorporate seasonal decor or small decorative items within the frames for added charm.
This project creates a timeless focal point that can be easily updated over time!
Fabric-Covered Canvas Art DIY
Another way to incorporate vintage-inspired charm is through fabric-covered canvas art. This DIY project allows for complete creativity while adding texture and warmth to your walls. Gather these materials:
- Blank Canvas: Choose the size that fits your space.
- Fabric: Select beautiful patterned fabric in keeping with the Shabby Chic aesthetic.
- Staple Gun: Perfect for securing fabric to the canvas.
Here’s how to craft your unique wall art:
- Cut Fabric: Cut your fabric to ensure there’s enough to wrap around the canvas edges.
- Wrap and Secure: Lay the fabric face down, place the canvas in the center, and pull the fabric over the sides, using a staple gun to secure it.
- Display: Once secure, hang your new piece of art on the wall or set it on a shelf.
These fabric-covered canvases are not only delightful pieces of decor but also can be customized to match your home’s colors and patterns, creating a warm, inviting space full of personality.
Floral Arrangements for Shabby Chic Vibes
Mason Jar Floral Centerpiece
Floral arrangements are an essential element in achieving the perfect Shabby Chic ambiance, and a Mason jar floral centerpiece perfectly captures that essence. This simple yet elegant decoration adds charm to any table setting, whether it’s for a family gathering or just to brighten your day at home. To create your own Mason jar centerpiece, gather these materials:
- Mason Jars: Choose jars of varying sizes for an eclectic look.
- Fresh or Artificial Flowers: Opt for soft-colored blooms like peonies or daisies.
- Twine or Ribbon: Use for sweet embellishments around the jar.
Here’s how to put it all together:
- Prepare the Jars: Clean the jars thoroughly and remove any labels.
- Fill with Flowers: Trim your flowers to the desired height and arrange them artfully in each jar.
- Add Decorative Touches: Tie twine or ribbon around the neck of the jars for a rustic finish.
This delightful centerpiece not only brightens your space but also brings the freshness of nature indoors!
Teacup Succulent Planters
Another whimsical and charming way to channel those Shabby Chic vibes is by crafting teacup succulent planters. This project is a fun nod to vintage dishware and offers a unique way to incorporate greenery into your decor. To create these delightful planters, you’ll need:
- Vintage Teacups: Look for mismatched pairs at thrift stores.
- Succulents: Opt for low-maintenance varieties like Echeveria or Jade.
- Potting Soil: Ensure it’s suitable for succulents.
Follow these steps to bring your teacup planters to life:
- Prepare the Teacups: Add a small layer of pebbles for drainage at the bottom of each cup.
- Fill with Soil: Top with potting soil, making sure to leave enough space for the succulents.
- Plant Succulents: Carefully place the succulents into the soil, arranging them as you like.
These teacup planters exude a playful charm and serve as perfect conversation starters while effortlessly enhancing your Shabby Chic home.
Decorative Accessories Revamp
Lace-Wrapped Mason Jar Candle Holders
Revamping decorative accessories can add a touch of elegance and charm to your home decor, and one fabulous project is creating lace-wrapped Mason jar candle holders. This simple DIY not only enhances your space but also sets a warm, inviting atmosphere for any occasion. To get started, here’s what you’ll need:
- Mason Jars: Opt for various sizes to create visual interest.
- Lace Ribbon: Choose delicate lace in soft colors such as cream or pastel.
- Tealight Candles: Use real or battery-operated for safety.
Here’s how to craft these lovely holders:
- Prepare the Jars: Clean the jars thoroughly and remove any labels.
- Wrap with Lace: Starting from the bottom, wrap the lace around the jar and secure it with hot glue or twine.
- Insert Candles: Place a tealight candle inside each jar.
The soft glow from these candle holders will create a beautiful ambiance, perfect for gatherings or a cozy night in!
Vintage Book Page Decoupage Vase
Another stunning way to revamp decorative accessories is by transforming an ordinary vase with vintage book pages through decoupage. This creative project not only adds character to your decor but also lets you repurpose materials you might already have at home. Gather these supplies:
- Clear Glass Vase: Use an old or thrifted glass vase.
- Old Book Pages: Choose pages with interesting typography or illustrations.
- Decoupage Glue: Mod Podge works beautifully for this project.
Follow these steps to create your unique vase:
- Tear the Pages: Tear the pages into various sizes for a layered look.
- Apply Glue: Use a brush to apply a thin layer of decoupage glue to the vase surface.
- Adhere Pages: Place the torn pages onto the vase and seal them with more glue, smoothing out any bubbles.
- Finish with Coats: Allow to dry and apply additional coats for durability.
This vintage book page vase adds a literary touch to your decor, making it a lovely focal point for displaying fresh or dried flowers. Revamping decorative accessories is a delightful way to express creativity while surrounding yourself with pieces that reflect your personal style!
Shabby Chic Lighting Projects
Mason Jar Pendant Lights
Lighting is a game-changer when it comes to setting the mood in your home, and creating Mason jar pendant lights can infuse your space with rustic charm. This DIY project not only enhances your decor but also provides a warm and inviting glow, perfect for kitchens or dining areas. To get started, you’ll need:
- Mason Jars: Choose jars of different sizes for a playful effect.
- Light Kits: Available at home improvement stores, these come with everything needed to hang and wire your lights.
- Ceiling Hooks: To attach your jars securely.
Here’s how to put it all together:
- Prepare the Jars: Clean the jars and remove the lids.
- Assemble the Light Fixtures: Thread the light kit wire through the opening of the jar.
- Hang: Use ceiling hooks to suspend each jar at varying heights for visual interest.
The result? A stunning statement piece that embodies Shabby Chic style!
Shabby Chic Chandelier Makeover
If you want to level up your lighting decor, consider giving a traditional chandelier a Shabby Chic makeover. This project allows you to reuse an old chandelier, transforming it into a gorgeous focal point that enhances the vintage vibe of your home. You’ll require:
- Old Chandelier: An antiqued or ornate frame works best.
- Spray Paint: Choose soft colors like white or pastel tones.
- Accent Elements: Think beads, floral embellishments, or lace.
Follow these steps for your makeover:
- Disassemble the Chandelier: Carefully remove any bulbs and pendants from the frame.
- Spray Paint: Coat the frame with spray paint, ensuring even coverage.
- Reassemble with Decor: Add back the original elements and supplement with beads or flowers.
This simple transformation breathes new life into an old piece, creating a beautiful chandelier that shines in your Shabby Chic home. Engaging in these lighting projects not only brightens your space but also reflects your personal flair and creativity!
Outdoor Shabby Chic Decor Ideas
Upcycled Garden Bench
Transforming outdoor spaces into charming retreats is a wonderful way to embrace the Shabby Chic aesthetic, and an upcycled garden bench is a fantastic project that combines functionality with style. Not only does it provide a cozy spot to relax, but it also adds character to your garden or patio. To create your own upcycled garden bench, you’ll need:
- Old Wooden Pallets or a Discarded Bench: Look for sturdy options that can hold weight.
- Sandpaper: To smooth out rough edges.
- Outdoor Paint or Stain: Choose soft, weatherproof options in pastel or neutral shades.
Here’s how to bring your bench to life:
- Prep the Wood: Sand down any rough patches to avoid splinters.
- Paint or Stain: Apply your chosen finish, allowing for proper drying time.
- Accessorize: Add cushions or throw pillows in floral patterns for extra comfort.
This project not only enhances your outdoor space but also invites you to savor nature in true Shabby Chic style.
Vintage Bicycle Planter Display
Another delightful outdoor idea is to repurpose an old bicycle into a whimsical planter display. This project is a charming way to bring life to your garden while showcasing your creativity. For this project, you’ll need:
- An Old Bicycle: Any vintage model will do, ideally one that isn’t in working condition.
- Flower Pots or Baskets: Choose various sizes and colors to create a vibrant display.
- Soil and Flowers: Select seasonal blooms that will thrive in your environment.
Follow these steps to set up your planter display:
- Clean the Bicycle: Remove any rust and dirt to make it look fresh and inviting.
- Attach Pots: Use wire or twine to secure pots to the handlebars, seat, or basket.
- Fill with Flowers: Plant vibrant flowers to create a stunning focal point in your yard.
This vintage bicycle planter not only adds a touch of whimsy but also showcases your love for gardening. With these outdoor Shabby Chic decor ideas, you can create enchanting spaces that welcome creativity and charm into your garden oasis!
Conclusion and Final Tips for Achieving Shabby Chic Decor
In wrapping up our exploration of Shabby Chic decor, it’s clear that this style offers a unique blend of vintage charm and cozy elegance. By incorporating upcycled furniture, charming floral arrangements, and rustic elements, you can create a home that tells a story and feels welcoming.
Final Tips to Embrace Shabby Chic Style
To help you along your decorating journey, here are some final tips:
- Mix and Match: Don’t be afraid to combine different patterns and textures. Layering floral prints with soft pastels will create visual interest.
- Embrace Imperfection: Remember that the beauty of Shabby Chic lies in its imperfections. Look for distressed finishes and vintage finds.
- Add Personal Touches: Incorporate family heirlooms or handmade items that hold sentimental value.
- Utilize Natural Elements: Bring in plants, flowers, and natural materials to enhance the breezy, lived-in feel.
As you dive into your Shabby Chic decor projects, let your creativity shine! Each piece you add is an opportunity to express who you are and create a warm, inviting space that reflects your unique style. Enjoy the process and happy decorating!


